How to Import PST to Office 365? Know the Best Ways

Microsoft 365 is the global subscription based services offered by Microsoft. This combines the productivity tools and combined services. However, the challenge arises when you need to migrate old data from your desktop to the Microsoft 365 platform. Outlook PST files are the most demanding file format which users wants to import. So, to resolve such queries here we aims to provide the verified solutions on how to import PST to shared mailbox. Let’s explore the solutions!
Microsoft recommends using Network Upload and Drive Shipping to import PST to Office 365 web application. However, in practice, both solutions sound technical, time-consuming, and involve multiple crucial steps to perform which might result in data loss.
It may appear confusing at first view but fear not. By following this guide, you’ll effortlessly navigate the process and successfully transfer PST into shared mailbox account in just a few simple clicks.
Through the manual method, it is difficult to import PST files to Office 365 mailboxes and other file formats from its current on-premise environment. So, for that, we discovered one method that can ease your migration process.
But to make you familiar with all the approaches, this article shares different methods. These will help you quickly migrate Outlook PST files to Microsoft 365 while maintaining the original mail folder and items.
5 Quick Steps to Import PST to Office 365 Instantly
- Step 1. Download, Install & Launch the Tool.
- Step 2. Opt Outlook & Office 365 as Platforms.
- Step 3. Select Desired Workload & Set Date Filter.
- Step 4. Validate Source & Destination Platforms.
- Step 5. Choose Users & Click on Start Import.
Other than the instant solution mentioned above, we have other methods as well. But first, let us discuss this advanced approach in brief.
Verified Way to Import PST to Microsoft 365 Account Professionally
In most cases, the manual import of PST files may not be the most efficient or suitable option. So, here we have one professional Email Migration Tool. This is specially designed to simplify the import process and also provide additional features in this migration process.
This utility can be used for importing multiple PSTs to Office Workspace in bulk. Also, you will be allowed to import PST files to other cloud platforms, like import PST into Exchange Server, etc.
Through this software, you do not have to go through the process of configuring an Outlook 365 account in MS Outlook again and again. You can simply import it directly to your desired destination.
It also offers impressive features, which enhance its overall functionality. Furthermore, it is also compatible with all software versions.
Additionally, a demo version of this software is also available. So, this allows you to assess its performance before committing.
So, without further ado, let us understand the steps to perform this utility.
Steps to Import PST to Office 365 Through Professional Solution
To follow the steps, first, you need to Download and Install the Software to upload PST to Office 365. After that, follow the steps mentioned in the below segment.
- Step 1- First, just Opt for Outlook as your Source Platform and Office 365 as your Destination Platform

- Step 2- On the same interface, pick the categories you want to import PST into Office 365 within the Workload Selection.
Additionally, here you can also apply Date-Range Filters according to your requirements.

- Step 3- Now simply provide the .pst file from the E:/PST/” folder where your PST file is stored. After that, Validate the necessary permissions to the files. After validations permissions will be granted to the source platform. Click Next to proceed.

- Step 4- Now, enter the Microsoft Office 365 Admin Details and Application ID for the Destination. Then click validate to confirm the credentials. After validations permissions will be granted to the admin account. Click Next.

- Step 5- Now, on the same screen you will be able to add multiple users from the source account.
Fetch Users- This automatically fetches the users from the source
Import Users- import the users through CSV
Download Template- Download template for creating a CSV file.
Select the method that is best suitable to you for adding the users.

- Step 6- You can see the list of users on the screen. You can also search for a specific mailbox and then select the user for data import. Select the specific user for selective data import to Office 365 through the Show Selected toggle bar.

- Step 7- Now add the destination user accounts by the following options:
User List Template: For manually uploading the CSV file, provide a sample CSV file
Import Users: Simply import users through CSV.

- Step 8- Click Validate to authorize the selective user source and destination accounts. Once all the users are validated, simply click on the “OK” button.

- Step 9- You can also prioritize the Import task. Just simply select the accounts based on priority as shown in the screenshots below.

- Step 10- Finally, click the Start Import to initiate the import process.

So, these are the simplest 10 steps that make this important migration easier and smoother.
Many Office 365 users face the same problem of how to import PST to Office 365 account. And if you opt for the manual solution, then you must require Outlook configuration. Many of the users find the technique lengthy and complex.
Therefore, you can opt for the one-shot solution that we discussed above for PST migration to Outlook 365.
Additional information- If any user wants to export Office 365 mailbox to PST file format, you can get help from this Email Backup Software.
Import/Export Option to Import PST to Shared Mailbox
This method is usable only for Office 365 desktop applications. Follow the listed instructions to easily import PST file to Office 365 account.
- Step 1- Sign in or add your Microsoft 365 email account to the Outlook client.
- Step 2- After adding the account, Go to File > Open & Export and click Import/Export.
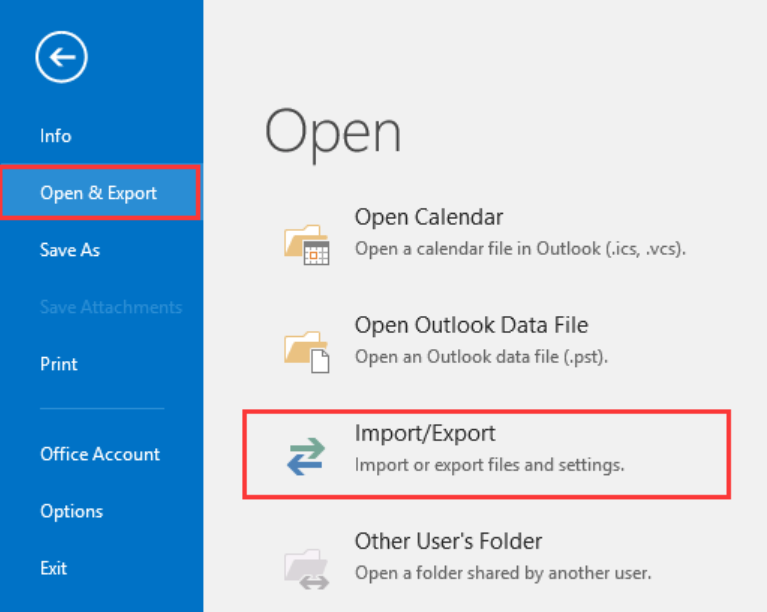
- Step 3- Select Import from another program or file and tap Next.
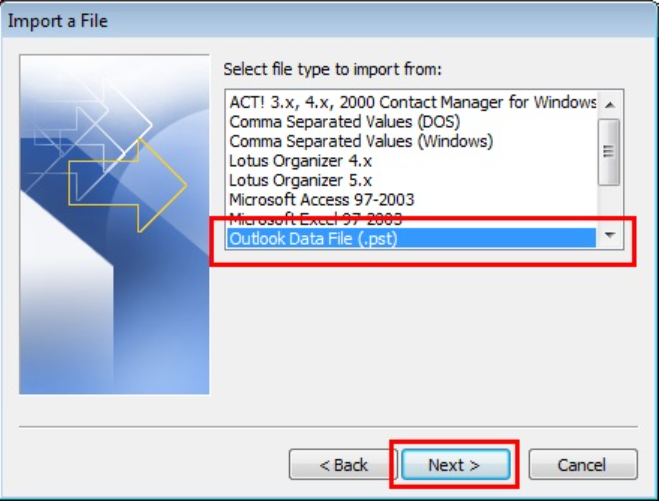
- Step 4- Select Outlook Data File (.pst) and then click Next.
- Step 5- Click Browse to choose the PST file and click Next.
- Step 6- Choose the Microsoft 365 email account and click Finish.
After the process is completed, you can access the mail items from your Microsoft 365 mailbox.
Limitations of the Manual Methods
While manual methods can help import PST files into Google Workspace, they can sometimes be risky and may lead to data loss. This approach can be time-consuming and has several limitations:
- It is suitable for transferring small amounts of data only. It is not advisable to import large PST files due to the time it takes.
- This method involves a complex migration process that necessitates technical expertise.
- It does not support the import of corrupted PST files.
- These are some of the challenges that might be witnessed; it’s time to explore a more professional solution.
Now, after discussing all the drawbacks that you might face while using the manual method, it’s time to explore a verified way to import PST to Outlook 365 account directly.
PowerShell commands also help users import PST to Office 365 mailbox. If you are worried about what PowerShell is exactly, then let us know what it is first.
What is PowerShell & Why use PowerShell for PST to Microsoft 365 Migration?
PowerShell is a powerful tool for scripting languages and a command-line shell that was developed by Microsoft. If we discuss this in terms of PST to Office 365 migration, PowerShell is used to improve various tasks related to the migration process.
So let’s understand how this method allows you to bulk migrate PST to Office 365. But before jumping into the steps, let first know what things to Consider for PST to Office 365 Migration with PowerShell
Things to Consider for PST to Office 365 Migration with PowerShell Method
While you are in the process of migrating data, you might be experiencing some issues. To avoid those issues, here are some of the prerequisites that should make your importing easier while using the PowerShell method.
- Make sure that you have given the necessary permissions and roles that are required to perform the migration.
- If you’re migrating PST to Office 365 then make sure that your network is configured and working as intended. Additionally, you must ensure, on a prior basis, that you have enough bandwidth available from your internet service provider.
- Your PST files should be consistent and have no errors or bad or corrupt items. To know this factor, you can scan each PST file with SCANPST.exe.
Now let’s discuss how this method works by knowing the steps that are mentioned below:
Steps to Import PST to Office 365 using PowerShell Method
Set up your system before you start using PowerShell to migrate or import your PST files into Microsoft 365.
Step 1. Prerequisites your system with Microsoft 365 Tenant
- First, download the Azure AzCopy tool on your system and ensure that you have sufficient administrative permissions to run PowerShell commands
- Configure Microsoft 365 and create a mailbox to import the PST files.
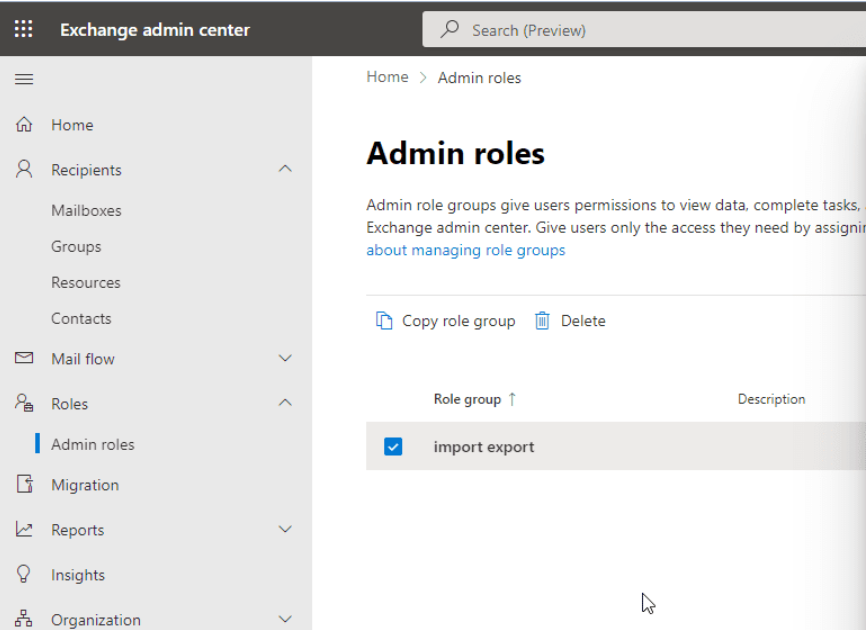
- Lastly, assign the mailbox import export role to Microsoft Office 365.
- After exporting the users’ mailboxes to PST format, copy all of the PST files into a separate folder with the correct names so that you may import them into Microsoft 365.
- Ensure the PST folder is accessible.
Step 2. Prepare PowerShell To Import PST to Office 365
- Download the Azure AZCopy tool.
- Move the Azure AZCopy tool to the Desktop
- To show you practically, we will proceed with the AZCopy tool via PowerShell to migrate PST files to Office 365.
Step 3. Create Mailbox Mapping File for PST Migration
You must first produce a CSV mapping file to map your PST files to the user accounts in Microsoft 365 before you can begin the process of migrating your PST files to Microsoft 365. To do this, follow these steps:
- Download a sample CSV template file or make a new CSV file with the columns FilePath, Name, Mailbox, and TargetRootFolder information in it.

- Now open the CSV sheet in MS Excel or Google Sheets.
- Update the CSV sheet with the PST file name and user account information to link the PST with users’ Microsoft 365 email accounts, along with other necessary information.
Once you have done with the above steps, save the CSV file and follow the steps to which are mentioned below:
Step 4. Create PST Import Job and Import PST to Office 365 Mailbox PowerShell
Follow the steps mentioned below:
- Open and log in to Microsoft 365 as a global administrator.
- Now, go to Data Lifecycle Management> Microsoft 365
- Click the “Import” tab
- Then select “New Import Job.” This will launch the Import Job wizard.

- Go to the import job and then select Upload your data.
- To upload the PST file to Azure cloud storage, you will need this SAS URL, so make sure you keep it safe and secure by clicking on “Show network upload SAS URL” and then clicking the Copy to Clipboard option to copy it into Notepad.

- To download and install the Microsoft Azure Storage utility, click Download Azure AzCopy. The AzCopy tool facilitates the uploading of PST files (20 GB or fewer) to Microsoft 365 on time.
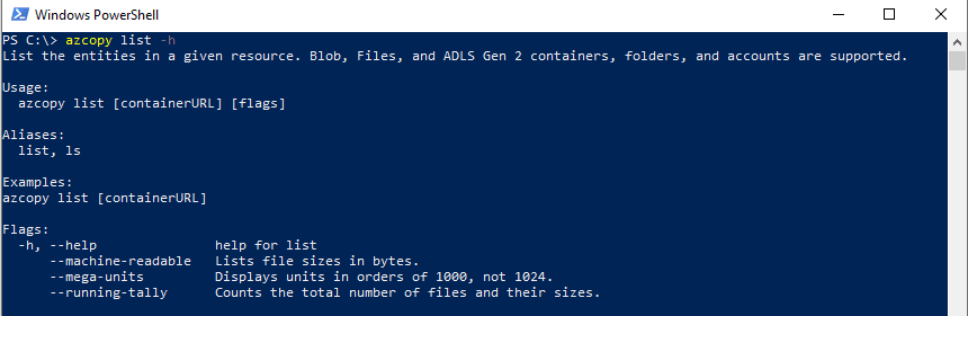
- When installation is finished, launch PowerShell on your local computer, go to Desktop, locate the Azure AzCopy tool, and use the following PowerShell command to upload the PST files:
azcopy.exe copy “PSTFolder or Location of pst files” “sas url=”>”
- After the PST upload process is finished, return to the Microsoft Office 365 import process and choose “I have access to the mapping file” and “I am done uploading my files”. Then, click Next.
- Then, on the next screen, you need to upload and validate the CSV Mapping file.
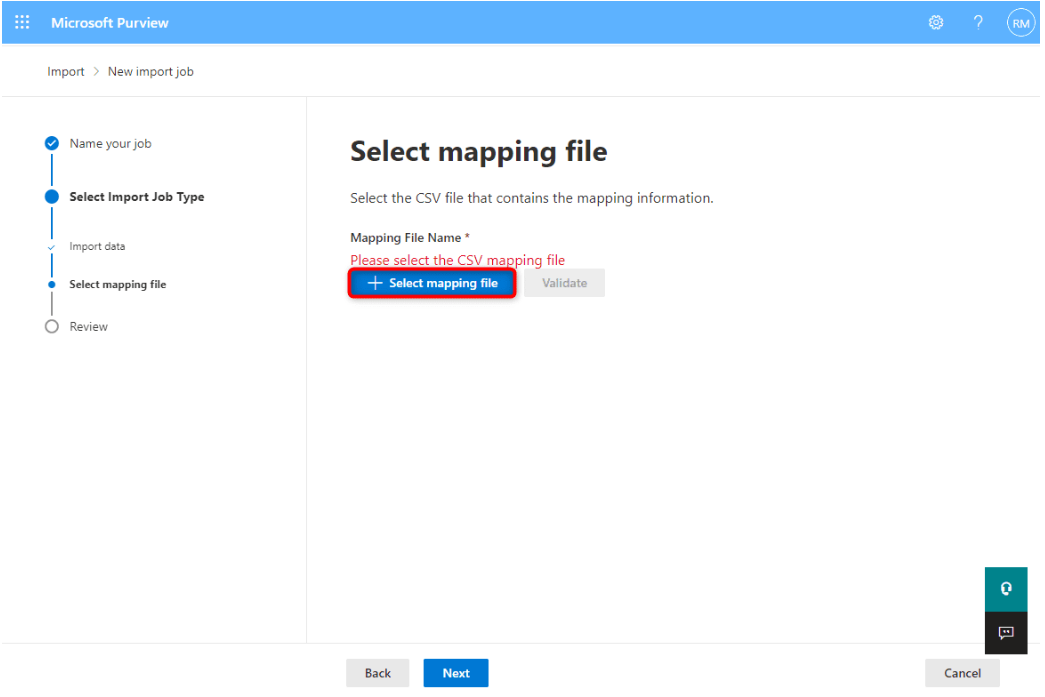
Once you’re done with the above-mentioned steps, you can now start the PST import wizard to successfully import PST to Office 365.
What are the Shortcomings of the PowerShell method?
- The most important drawback is that it requires admin permissions. If you do not have access permissions, then you can allow Office 365 to import PST files.
- PowerShell scripts often rely on network connectivity. If you face any issues with the network, then it may disrupt the execution of scripts.
- As rightly said, “small mistakes can have significant consequences.” Likewise, as we already know, PowerShell relies on manual scripting. So there is a high risk of human error in writing or executing scripts.
- For those who are unfamiliar with the PowerShell terms, it could be a learning curve for them. As it requires a lot of technical knowledge. Writing PowerShell scripts and understanding syntax can take a lot of time and effort for non-technical users.
- PowerShell is a Microsoft service that is effectively dependent on the stability and reliability of Microsoft’s services. Any minor mistakes or disruptions can impact the execution of PowerShell scripts.
Additional Information
From the start, we are learning about Office 365, but in the context of Microsoft 365, the term “Archive” is often used. So, what does Office 365 Archive refer to? This term typically refers to features related to the management of emails for long-term storage and compliance purposes.
People often use this for preserving email data that they no longer actively use but need to retain for legal or regulatory reasons. To import PST to Office 365 Archive, you must have the Archive feature enabled for the specific user mailboxes.
If the Archive feature is not enabled in Office 365 then PST migration to Office 365 may fail. Additionally, If you attempt for PST to Office 365 Archive mailbox migration that doesn’t exist, then the outcome is likely to be unsuccessful.
So, this software also allows you to move PST files to online archive without any hassle. You just need to follow the same steps by choosing the source platform and destination platform.
Through this software, you can easily import with the advanced features. It also provides selective data migration with smart data filters like date, item type, etc to migrate PST files to Office 365 Archive in bulk.

Some Related FAQs
Q. Why do experts recommend a professional method solution over a manual method solution?
It’s better to recommend a professional solution over a manual one. This is due to its efficiency and bulk import capabilities. Also, it has support for other cloud platforms, the avoidance of repetitive Outlook account configuration, and additional features like compatibility with all software versions.
Q. How do I import PST to Office 365 directly?
- Launch PST to Office Import Tool on Your System
- Select the Source Platform for Data Files (Archived PST)
- Choose the Destination Platform and Workload Migration
- Authenticate Source and Destination Platforms
- Select Users and then Start the PST to Outlook 365 Import
Q. Can I import one data file into three different platforms with only one license?
No, this email migrator allows users to import multiple data files into the destination account with one license only. You don’t need to purchase multiple licenses for multiple data files.
Final Say
Importing PST to Office 365 is a valuable process that can significantly enhance your data accessibility, security, and collaboration. Whether you are an IT expert or a non-IT person, this guide gives you the knowledge to execute this task successfully. We have given you all the possible ways through which you can migrate your data from any source to the destination platform.
Just follow the steps mentioned in this article, and you’ll be on your way to accessing your archived PST into Outlook 365 account.
