Learn How to Export Office 365 Mailbox to PST Using Different Ways

Microsoft Office 365 is one of the most trustworthy and reliable web-based email applications that store data in the cloud. It renders multiple functionalities, such as file sharing, cloud services, and many more. Since Office 365 requires internet connectivity to access the data. Thus, to access the data in offline mode, it is necessary to export Office 365 mailbox items locally. Hence, in this writeup, we are going to cover the top 3 ways to export Office 365 mailbox to PST file, these include, PowerShell, eDiscovery, and automated software solutions.
Table of Contents:
Why Do I Need to Export Mailbox from Office 365 to PST File?
Numerous reasons are causing the user to export Office 365 mailbox to PST format. Listed below are some of the noteworthy:
- It is observed that hackers attack Office 365 profiles and alter the data. Hence, it is important to keep the Exchange Online mailbox in PST format locally.
- Sometimes users intentionally or accidentally delete the data. So this deleted data can be restored if an appropriate backup is taken for the same.
- If the data gets corrupted, it is not feasible to retrieve the data manually. Therefore, it is important to archive the Office 365 mailbox into PST format.
- Access to an Office 365 account requires adequate internet supply. In case of poor internet connectivity, the stored data in PST format can be used.
So, after discussing all the possible requirements, let’s understand what would be the best approach through which you can export Office 365 to PST file format. As discussed above let’s perform this task by using each of the methods in the coming sections.
How to Export Office 365 Mailbox to PST Using PowerShell Command?
Using the PowerShell command requires admin permission to execute, which is one of the major drawbacks. Moreover, the manual method using PowerShell is quite complex and requires sufficient technical expertise and familiarity with Microsoft 365 as well as Exchange.
Here, we have executed this process with the help of an example, wherein the mailbox to be exported is techsupport@teamsystools.com, and the new account that is created in Outlook for exporting is freshtechsupport@teamsystools.com. The account that holds the admin rights is hr_admin@teamsystools.com. Follow the below-mentioned steps sequentially to perform them via PowerShell as an administrator.
Step 1. Launch the Connection using MS Exchange Server using PowerShell
1. To initiate the process of exporting Office 365 mailboxes to PST format, run the below command in PowerShell,
“$UserCredential = Get-Credential”
2. In this command, enter the credentials of Office 365 which include the username and password mentioned under the Windows PowerShell Credential Request dialog box. Here, enter the credentials of hr_admin@teamsystools.com in the displayed window.
3. Now, run the below-stated command.
“$Session = New-PSSession -ConfigurationName Microsoft.Exchange -ConnectionUri https://outlook.office365.com/powershell-liveid/ -Credential $UserCredential -Authentication Basic –AllowRedirection”
4. Then, run the below-mentioned command,
“Import-PSSession $Session”
Step 2. Grant Access to Mailbox for Export Via PowerShell
Now, this example will grant techsupport@teamsystools.com full access to freshtechsupport@teamsystools.com mailbox:
“Add-MailboxPermission – User freshtechsupport@teamsystools.com -Identity techsupport@teamsystools.com -AccessRights FullAccess -InheritanceType All”.
Step 3. Launch Outlook Profile for New Account
In this step, you need to open MS Outlook as freshtechsupport@teamsystools.com and make sure that techsupport@teamsystools.com is available in the mailbox in the left pane. Sometimes, the permission takes seconds or even minutes to get applied.
Step 4. Check MS Outlook Configuration Settings
Now in this step, check whether Outlook is ready to be configured to download all the emails within the limited period. Follow the steps below:
- Firstly, click File menu >> Info page >> Account Settings.
- Now, click Account Settings again and select the account.
- After that, click the Change button and ensure that the Use Cached Exchange Mode option is enabled.
Step 5. Transfer Mailbox to PST Using Import/Export Wizard
- Open Import/Export wizard to export techsupport@teamsystools.com to PST file. For that, click the File menu >> Open & Export >> Import / Export option.
- Now, select Export to a file from the given options and click Next.
- Then, choose the Outlook Data file (.pst) option and click on the Next button.
- Select techsupport@teamsystools.com from the given list and click Next. Make sure that the Include Subfolders checkbox is selected.
- Provide a new name to the file and a storage location where the PST file will be stored i.e., c:\tmp\outlook-archive- techsupport@teamsystools.com -20160209.pst.
- Under the Options section, choose either Do not export duplicate items or Replace duplicates with items exported option and click Finish to export the mailbox from Office 365 into PST format.
- Enter the password for the PST file if required else leave it blank if the policy allows and click on the OK button.
- Now, Outlook will remain inoperative until the export is under process. Therefore, wait to get control of accessing the file.
Step 6. Confirm the Export Process is Successfully Completed
Now, to check whether the Office 365 export process is completed, check the mailbox size on the Server and compare it with the exported PST file size. Follow the below steps to do the same,
- From the right pane, right-click on the mailbox and select Data File Properties options.
- Then, go to the General tab and click on the Folder size button.
- After that, choose the Server Data tab and note the value mentioned in Total size.
- Check the properties of the exported PST file. Make sure that the size of this file is comparable to the Total Size value which is mentioned by MS Outlook.
Step 7. When the Export Process Gets Completes
After the export process is completed, you need to remove all the permissions that were granted initially through Powershell. For that, run the below-stated command,
“Remove-MailboxPermission -User freshtechsupport@teamsystools.com -Identity techsupport@teamsystools.com -AccessRights FullAccess”
Step 8. Close the PowerShell Session
Finally, the PowerShell session needs to be shut down after all the permissions are removed. To do this, follow the below command:
“Remove-PSSession $Session”
If all the above steps are followed sequentially, a user successfully export a mailbox from Office 365 to PST file format, only if you have administrator rights.
What are the Shortcomings of Using PowerShell to Export O365 Emails?
The foremost drawback is it requires Admin permission. If a user does not have permission, he/she will not be able to perform Office 365 export mailbox to PST process.
Does not maintain data integrity, as the email formats are changed after exporting PST files from Office 365 Online.
It consumes valuable time due to its lengthy steps and one must have genuine technical knowledge to perform the O365 export process.
Moving to another method, let’s get familiar with its step-by-step operations.
How to Export Office 365 Emails to PST File Through eDiscovery Export?
Step 1. Firstly, you need to log in to the Exchange Admin Center. For that, you need to provide credentials for your Office 365 admin account.
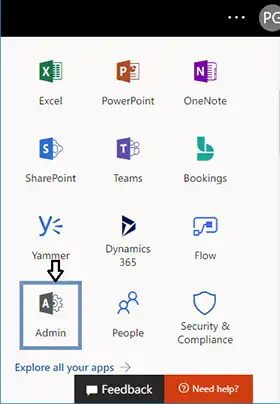
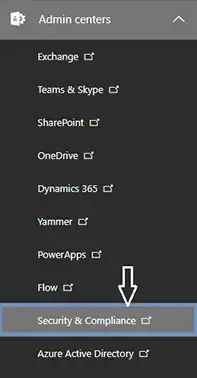
Step 2. Then, go to the Admin Center and select security and compliance from the menu.
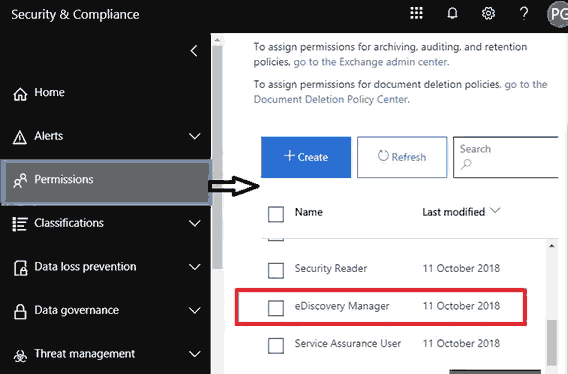
Step 3. Now, from permissions, select eDiscovery Manager.
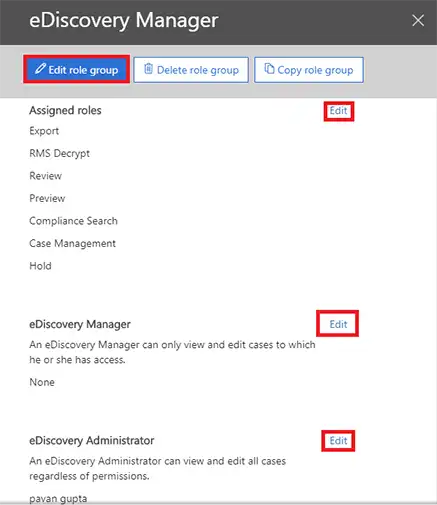
Step 4. Click the Edit icon to change or add other roles that are necessary for the eDiscovery group.
Step 5. The role groups come with a few pre-assigned roles by default, like Compliance search, Case Management, Export, Hold, Preview, Review, and RMS Decrypt.
Step 6. If you’re unable to locate the export role, then just proceed with Step 7 and add the role.
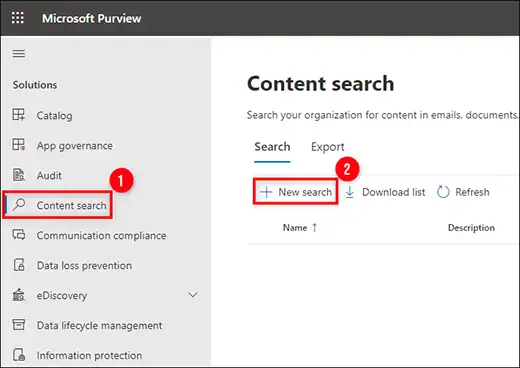
Step 7. Now, select more resources from the menu, and a panel containing all the Microsoft resources will emerge. After that, access the Microsoft Purview Compliance Portal. Then, select Content Search from the left panel, and finally click on the New Search Button.
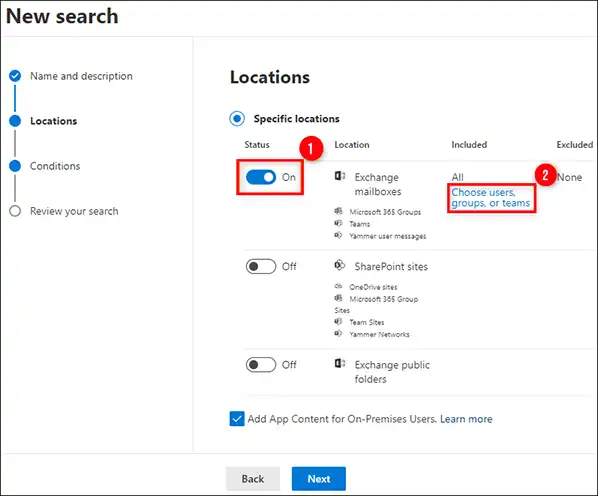
Step 8. Now the window will open, from where you can easily customize every aspect of the content search. Here, you can also give the content search name and description. You can also fill in the necessary information, like location. This allows you to choose which specific user account to export into PST files.
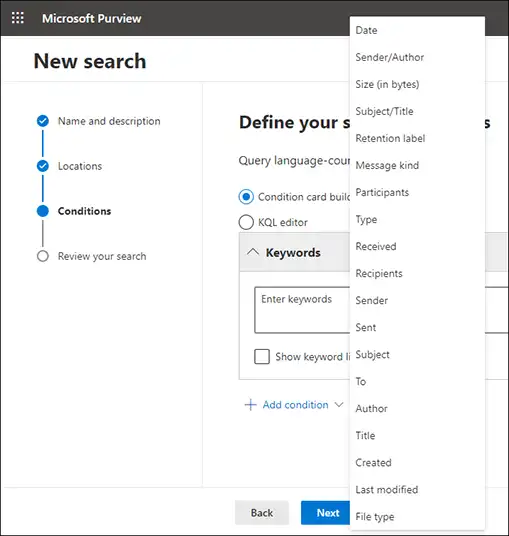
Step 9. You can also apply filters like query language/region, keywords/phrases, conditions, time, message fields and properties, etc in the condition bar. This enables you to selectively export the PST file.
Step 10. After completing all the necessary customizations, just click on Submit and then Done to initiate the eDiscovery right away.
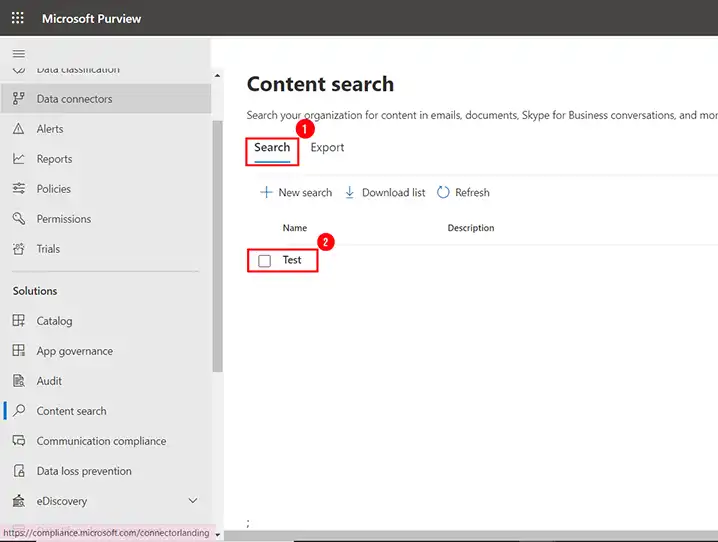
Step 11. These customizations will then launch the eDiscovery search in the background, and you can monitor its progress by just clicking on the search tab.
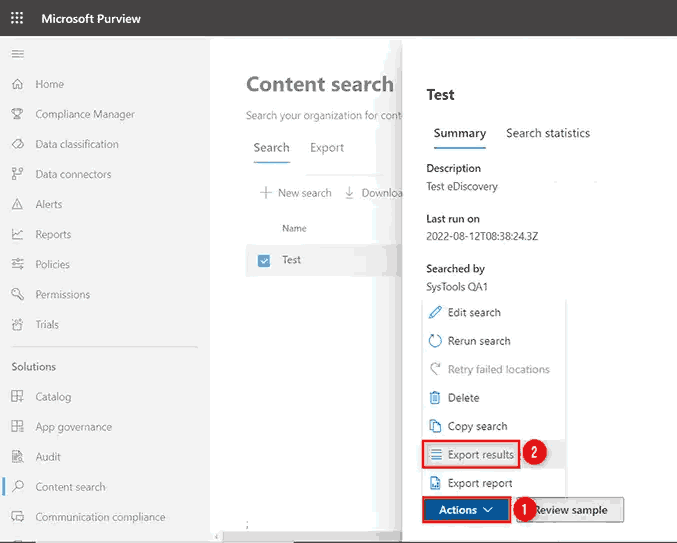
Step 12. This is where you can view the eDiscovery search status. After the search is finished, just click the Action tab and select Export Results.
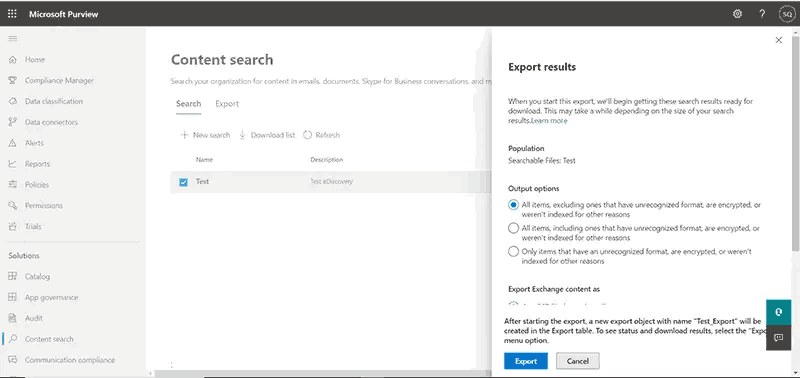
Step 13. Now, you have various options in the window below, from which you can select particular scenarios.
For example, if you need to export an encrypted file, you can select this option. Additionally, you can also alter the exported results in their entirety before downloading them.
Note- If you’re unfamiliar with these options, it is advised that you export the data by using the default settings.
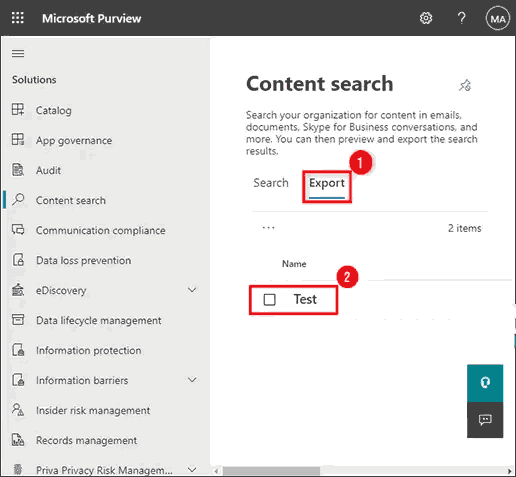
Step 14. Then, hit the export tab, and it will instantly start exporting. Now go to the export tab and select your search, and you can track the status of this process.
Step 15. After the successful completion of the process, just click on the close button. Then hit the Download results button. Also, make sure to copy the unique export key. Use this key in the clickOnce extension when it pops up.
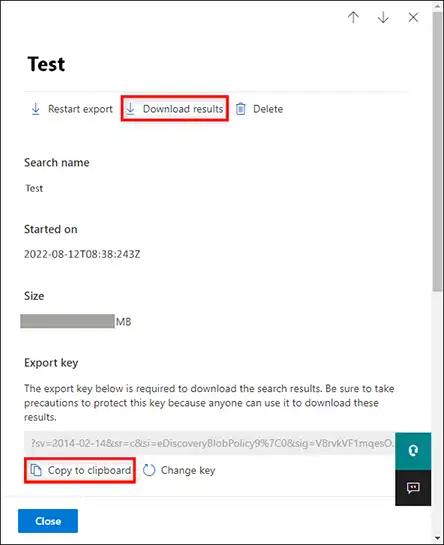
Step 16. The eDiscovery tool will launch when the pop-window will appear. Now, paste the export key there. Now, choose and save the exported PST file to the destination directory you specify. Finally, click on Export to export Office 365 files to PST files.

Limitations of Using the eDiscovery Export Process
As you see, it’s a long process. So it also has some drawbacks. Before opting for this approach, you must also understand the limitations. Listed below are some of them:
- It is a time-consuming approach because, in this approach, you need to perform every step.
- One of the major drawbacks of this method is that it doesn’t allow the selective export feature while exporting data
- You must be sound technically, as native users might face difficulty in performing these steps.
Now let’s move on to another approach, which is the automated approach.
Quick & Reliable Approach to Export Mailbox from Office 365 to PST File
There is no guaranteed solution using the eDiscovery and PowerShell command to export the mailbox from Office 365 to PST format. Thus, we recommend choosing the best-automated tool, such as the Cloud Backup Tool. This software aims to eliminate all the issues linked with PowerShell and eDiscovery methods.
This tool efficiently exports all data from Office365 to PST file format. Though the manual method is free of charge, it doesn’t provide you with a complete procedure with easy steps.
It also has built-in features, which makes this software easy and experts’ first choice. This allows users to export Office 365 mailboxes into multiple file formats, like exports G-Suite (Workspace) email to PST, Office 365 to MSG, and many more. Additionally, it also provides the feature of saving emails with attachments, contacts, calendars, and tasks.
To know the workings of this software, you first need to Download and Install the software on your system. After this, follow the steps mentioned below.
Follow the Steps for Easy Exporting Through This Advanced Software
Step 1. Firstly, provide Source Platform as Office 365 and Destination as Outlook.
Note: Here, you don’t require Outlook to be installed on your system. The destination only indicates that PST is selected for export.

Step 2. Now select the category from the workload selection that you want to export from Office 365 to Outlook.

Step 3. In the source window, get the Date-Range Filter option. Through this, you can perform a date-based selective export. Then click next.

Step 4. Now provide the Office 365 Email ID and Application ID and then Validate.

Step 5. Now browse the folder path and set the destination where you want to save your PST files.
Note- Your folder path should not be more than 20 characters.

Step 6. From the dropdown menu, select your preferences according to your requirements. The value specifies the maximum size limit for each file(s).
For example:
- If you need to export 11 GB of data and you have to choose a 10 GB PST size. In this case, the software will provide two PST files. One of 10 GB and another with the remaining 1 GB.
- If in case the exported data (11 GB) is smaller than the partition size (20, 30, or 40 GB) you will end up with the single PST file of the original size.
- Now if you have a lot of mailboxes to export, let’s say around 200 GB, now you want to export them and you pick a 40 GB partition size. Now, the tool will automatically divide the data into five separate PST files like 40 GB PST files (5* 40=200 GB).
Step 7. Now, there are multiple ways to add users from the source account
- Import Users – Through this users will import via CSV.
- Fetch Users – This will fetch users automatically from the source domain.
- Download Template – This feature will download the template.

Step 8. Now you will find Show Selected toggle which allows you to view the list of selected users. You can also search for a specific mailbox and pick the user to export data.

Step 9. Finally, click on the Start Export button to export Office 365 mailbox to PST file.

After performing all the above steps, you will successfully export your Office 365 data.
It is the most trusted software by customers, additionally, it also exports emails, calendars, and contacts from Office 365. It does not require technical knowledge to perform the entire process. Hence, it is easy for novice users to export Office 365 mailbox to PST format without using Outlook.
Additional Information
We have discussed the export process for regular mailboxes, however, there are several scenario when the admins need to export Office 365 Online Archive mailbox to PST. So don’t worry as this software allows you to export the data from archive mailbox too. To export Office 365 online archive mailbox, it is required that you must have the Archive feature enabled for the specific user mailboxes.
So, through this software, you can export data in bulk without any hassle. You just need to follow the same steps as mentioned above by selecting the source as Office 365 Archive and Destination platform as Outlook.

Let’s Wrap Up
Since, exporting Office 365 mailbox to PST format is important, as it allows for utilization for backup purposes. Hence, many people have expressed significant concerns about data security while exporting from cloud platforms such as Office 365. This blog has endeavored to provide different solutions that can work for this task. The above tool overcomes all the limitations associated with the PowerShell and eDiscovery export methods. Additionally, users can download the free trial of this tool.
Some Related FAQs
Q1. How to export mailboxes from Office 365 to PST files instantly?
- Step 1. Download and Install the advanced software.
- Step 2. Provide Source and destination platform to the tool.
- Step 3. Select the category from the Workload selection.
- Step 4. Authentic source and Destination Platforms.
- Step 5. Finally, tap Start Export to export.
Q2. Why should I consider using the professional solution for exporting Office 365 emails to PST instead of the manual solution?
Users might opt for a manual solution because of budget constraints, but a manual solution doesn’t maintain data integrity throughout the export process. Apart from this, the manual methods comprise several limitations as discussed above. On the other hand, professional solutions, as mentioned in the article, are fully automated, which not only saves time but also overcomes all the limitations of manual methods. The software is capable enough to minimize the chance of human error.
Q3. What are the other file formats that this software supports while exporting from cloud platforms?
The most prominent features of this advanced software allow users to export into PST, MSG, MBOX, PDF, and EML and use the resultant files in their supported applications.
Q4. How many mailboxes can I export from a single license of the software?
MSOutLookTools offers user-based licensing. That means users can export only one user per license.
